Friday, 28 March 2014


DOWNLOAD HERE !
System requirement :-
Winodows/Xp/2000/Only
Processor: 1.0 GHz AMD
Memory: 256 MB
Graphics:32 MB
Installation Method :-
1.. Unrar and Extract files save any disk
2.. process will finish automatic
3.. in extract files have a Registry file with Setup Name so
click on setup file and register the game and Play.
Enjoy!
HOW TO REVEAL HIDDEN ASTERISKS PASSWORDS IN WEB BROWSERS
Remember the specific situation, signing in your account with a just single click because web browser is saving all your passwords in your case. We know this can be convenient nevertheless since you’re not typing your passwords any-more,

eventually you’ll forget your password in a few days. For security reasons, the password field in all browsers will be masked along with “asterisks” which won’t allow any next person (even you) to see the original entered password. But, what if you wish to reveal the string powering the asterisks? There's actually few workaround with regard to revealing the original passwords behind the asterisk and within the entire length of this write-up we’ll become discussing a number of known solutions to reveal the characters behind the asterisks in a variety of browsers.
Google Chrome:
Starting with Google chrome, the simplest way to reveal an original passwords guiding the asterisk is usually using built in Inspect element feature from the browser.
· You just need to right click on the password field in the browser where you will get an option "Inspect Element".
After clicking on it, "Web Inspector" will certainly open out and there you will see some code that's basically Html code and you just need to replace the "password" word with "text" word and it also will reveal the language behind your asterisks.


There’s another way using JavaScript which can be quite easy and quick as compared to above method. Just open a site that makes it possible forallows users to login and after typing the password, just enter the following JavaScript code in the address bar.
Javascript: alert(document.getElementById('Passwd').value);
after entering the above code inside the address bar, press enter and it will appear a pop up a window with your password written on it.

Mozilla Firefox:
The Next most common browser is "Mozilla Firefox".
· The chrome's "Web Inspector" trick is also applicable in Firefox.
· Open a site that asks for login (like Facebook), click on the password field in the browser where you're going to get an option "Inspect Element". After hitting it, "Web Inspector" will open out and there you can see some code which is basically Html code and you simply need to replace the "password" expression with "text" word and it will reveal the words behind the asterisks as shown in screenshot below.

Aside from this, there’s a different way that is quite easy and quick as in comparison to above technique. For that you’ve to create a bookmark while using following JavaScript code as URL from it.
javascript:(function(){var s,F,j,f,i;s="";F=document.forms;for(j=0;j<F.length;++j){f=F[j];for(i=0;i<f.length;++i){if(f[i].type.toLowerCase()=="password")s+=f[i].value+"\n";}}
if(s)alert("Password is:\n\n"+s);else alert("No passwords");})();
after saving this as a bookmark, open a niche site that will allow users to be able to login and also typing the password, open the saved bookmark by clicking on it and t will pop up a window with your password written on it.

Opera:
Next comes the "Opera" in that you can use "Dragonfly", which is an in built tool, to reveal the words behind the asterisks just like chrome's "Web Inspector". Open a site that asks for login (like
Facebook), right click on the password field in the browser and select "Inspect Element" option. After clicking on it, "Dragon Fly" will open out and you’ll see some code which is basically Html code and you just need to replace the "password" word with "text" word and it will reveal the words behind the asterisks as shown in screen shot below.
Facebook), right click on the password field in the browser and select "Inspect Element" option. After clicking on it, "Dragon Fly" will open out and you’ll see some code which is basically Html code and you just need to replace the "password" word with "text" word and it will reveal the words behind the asterisks as shown in screen shot below.

Internet Explorer:
In the same manner you can apply this trick on Internet explorer. First of all open any site (Gmail in our case) that allows user login. Now for bringing out “developer tools” press thef12 key. A new window will be opened and press Ctrl+B to enable selection of elements. After that go to login page and select the password field, doing this will take you to the password field’s code in developer window (highlighted by yellow). Now, you just need to replace the "password" word with "text" word and it will remove the asterisk mask in the password field, see screenshot below.

Apart from this, there’s another way which is quite quick and easy as compared to above method. Just open a site that allows users to login and after typing the password, just enter the following JavaScript code in the address bar.
alert(document.getElementById('Passwd').value);
After entering the above code in the address bar, press enter and it will pop up a window with your password written on it. (See pic below)


DOWNLOAD
Password: ir-dl.com
Note: If It Show "403 - Forbidden", Then Click into Url box And Press Enter Butto
How to change the boot logo in Windows 8.1 and Windows 8 ?
I have been asked how to change the boot logo in Windows 8.1 and Windows 8 thousands of times by the users of my apps and by Winaero blog visitors. This is the most popular feature request for my Boot UI Tuner. Today, I am going to share with you a tutorial which will allow you to change the boot logo of Windows 8 and Windows 8.1 and replace it with some custom logo. Read the instructions below.
Preparation:
First you need to have full access to the following file. This file is where the boot logo is stored:
C:\Windows\Boot\Resources\bootres.dll
The easiest way to obtain full access is the TakeOwnershipEx application. It will allow you to obtain full access to any file with one click!
Alternatively, run the following commands in an elevated command prompt:
takeown /f C:\Windows\Boot\Resources\bootres.dll
icacls C:\Windows\Boot\Resources\bootres.dll /grant %username%:f
Replacing the file containing the boot logo:
- To prepare the replacement bootres.dll, create a directory on your C drive: C:\Bootlogo. Copy the bootres.dll file to that folder.
- Create a folder called Logos. This is folder where the images you extract from the DLL go so you can edit them.
- Now you have to download some additional apps into your Bootlogo folder:
Signer: Signer is a tool to work with custom certificates and self-signing.
Latest alpha version of 7-Zip: 7-zip is a famous free, archiving app. Don't worry, even if it says alpha, it's stable.
Restorator: This is the best resource editing tool, but it is not free. Only the Restorator app will work in this case, because other apps can damage the resources inside the DLL. e.g. the popular freeware, Resource Hacker is not suitable in our case. - Using Restorator, open the bootres.dll file and navigate to the RCData section on the left. Within it, you will see a file called "1". Right click it and extract -> Extract as -> extract as... and save it asRCDATA_1.wim.
- Open the RCDATA_1.wim file you extracted in the previous step using 7-zip and extract the images to the folder you made to edit them. They need to be of the same resolution as the originals. Their format must be "24-bit bitmap". Use your favorite image editor to make replacement images.
- When you finish, use 7-Zip again to pack the edited images back into the RCDATA_1.wim file.
- In Restorator, right click "1" and select Assign -> Assign to.... Browse for your edited RCData_1.wim.
- Save the DLL and close Restorator.
- Open an elevated command prompt, change to the C:\Bootlogo folder by typing:
cd C:\Bootlogo and then type the following command in your C:\Bootlogo folder:signer /sign sign bootres.dll
The Signer app will ask you to install a root certificate, choose yes. - Place your modified bootres.dll file back in the C:\Windows\Boot\resources folder and reboot your PC! If your logo disappears, and you see only the boot animation (the spinning circle), then try one of these two things:
- run the following command in an elevated command prompt:
Bcdedit.exe -set TESTSIGNING ON
Reboot your PC. - Repeat all steps once again, it's possible you did something wrong.
- run the following command in an elevated command prompt:
Desktop gadgets and sidebar for Windows 8.1
As you may have noticed, Desktop Gadgets and Sidebar are missing in Windows since Windows 8 RTM. Personally, I don't miss gadgets since I did not use them. But a lot of people have been missing them. If you can't live without desktop gadgets, there is good news for you: desktop gadgets and sidebar are available for Windows 8.1.

My friend PainteR has updated his unofficial installer which allows you to get gadgets back in Windows 8.1 with just a few mouse clicks.
So, follow the installer wizard.

Note that it supports all possible Windows 8 languages, so you will get gadgets and sidebar's interface with your native language!

Wait for the installer to finish and right click on the desktop after that. You will see the familiar "Gadgets" item in your desktop context menu. Enjoy:

In action:
Before you download
- I am not sure that this is legal. Check the license agreement of Windows 7 and Windows 8 before you use this installer.
- All credits goes to PainteR. No one from Winaero is associated with this installer.
Download Desktop Gadgets for Windows 8.1
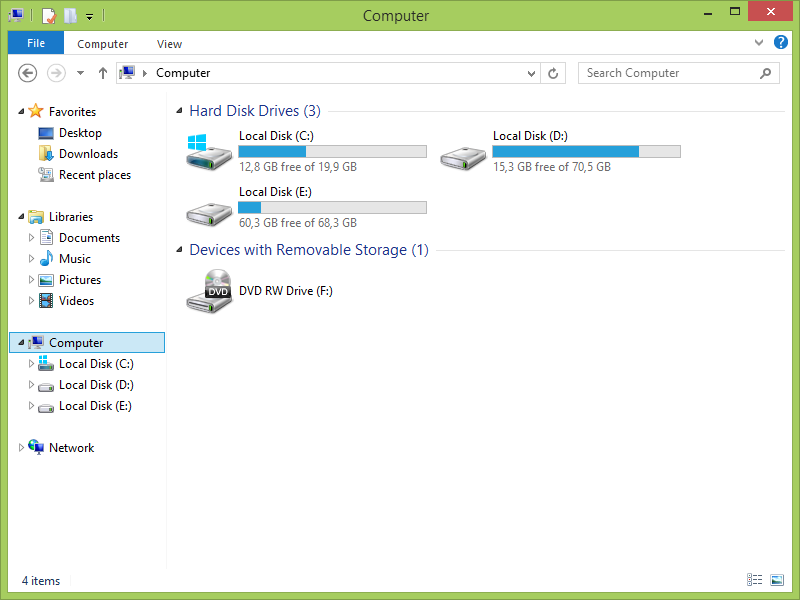
How to remove Documents, Pictures, Music, Videos and Downloads folders from the Computer folder in Windows 8.1
2 comments
Update: This manual method is no longer needed if you are not comfortable fiddling with the Registry. Use our easy to use tool, This PC Tweaker to hide and show the folders you want.
In Windows 8.1, there are some additional folders that show in the Computer folder. In case you don't like them showing in Computer or don't need them, follow this simple tutorial to learn how to remove them.
- Open regedit.exe (See our Windows Registry Editor fundamentals)
- Navigate to
HKEY_LOCAL_MACHINE\SOFTWARE\Microsoft\Windows\CurrentVersion\Explorer\MyComputer\NameSpace\
- Delete the following sub-keys:
{1CF1260C-4DD0-4ebb-811F-33C572699FDE} (Music)
{3ADD1653-EB32-4cb0-BBD7-DFA0ABB5ACCA} (Pictures)
{A0953C92-50DC-43bf-BE83-3742FED03C9C} (Videos)
{A8CDFF1C-4878-43be-B5FD-F8091C1C60D0} (Documents)
{374DE290-123F-4565-9164-39C4925E467B} (Downloads)
Before:

After:
Subscribe to:
Comments (Atom)